One of my long-term best friends, Tom Eickhoff, is a designer.
Let me rephrase. He is a world-famous designer whose works appear in almost 100 books about the best interior designs. His most recent project include the owner of some major American sports teams, and a prince in the Arab Peninsula. He's one of the few people I know who is a true genius.
He said the difference between art and design is that designers need to think about the person they're serving with their creativity. Artists do whatever they want, and they curse the unappreciative, but designers use their visions of beauty to serve others.
Don't get me wrong: Tom appreciates artists. He's the one who took me to the one of the most creative and best-designed educational experiences of my life: "The Van Gogh Immersive Experience"
Tom and I connect so well because he helps me notice the design that goes into architecture and furniture, and he appreciates the design that goes into teaching.
Here's what brought us together:
- Art (the creative expression of choice) matters. Even if no one appreciates or even consciously notices your choice, your choice matters. (Van Gogh only sold a few paintings in his lifetime.)
- Design matters. As humans, we all are drawn to or opposed to certain types of images, spaces, and sounds. Our species needed that type of instinctive drive for survival, and our cultures need it for identity. We should pay attention to it.
- Design connects with science. Our preferenace for patterns, colors, and spaces is influenced by biology, history, and culture, so some designs just "feel like home." We can use scientific methods to study and apply those aspects of design.
- We function best at rest. This doesn't mean we do our best work when we're on vacation; it means that we do our best work when our work feels restful. When our work feels like we fit into a pattern, and we feel like we're making the well-designed pattern spread joy to more people, we feel good. And when we have that type of good feeling, we're at our best.
- We are all designers. We can be good designers or bad (thoughtless) designers, but humans design. Albert Einstein said, "Creativity is intelligence having fun." Design is applying creativity to making life better - even if those improvements are "99% invisible".
Those points bring us to this module's essential questions: How could you use digital tools to design learning opportuniites, materials, and "spaces" that encourage learners to...
- look forward to every new interaction
- click on every link and video
- see themselves as contributers to learning
- creatively express their learning in ways that address real-world problems
- share and celebrate learning with their colleagues?
To get some ideas going, watch these videos.
- "The first secret of design is... noticing" - Tony Fadell
- Innovative Learning Spaces
- How art, technology, and design inform creative leaders
(I'd like to thank Dr. Jonathan Crocker for his help with this module! - Randall)
Like most teachers, I began teaching with a textbook and curriculum that were chosen by their school or the government.
However, you're becoming experts in something new. Digital pedagogy integrates inquiry-based learning, problem-based learning, and project-based learning to solve real-world problems across academic fields. That means that you are the ones who will need to design the curriculum and materials!
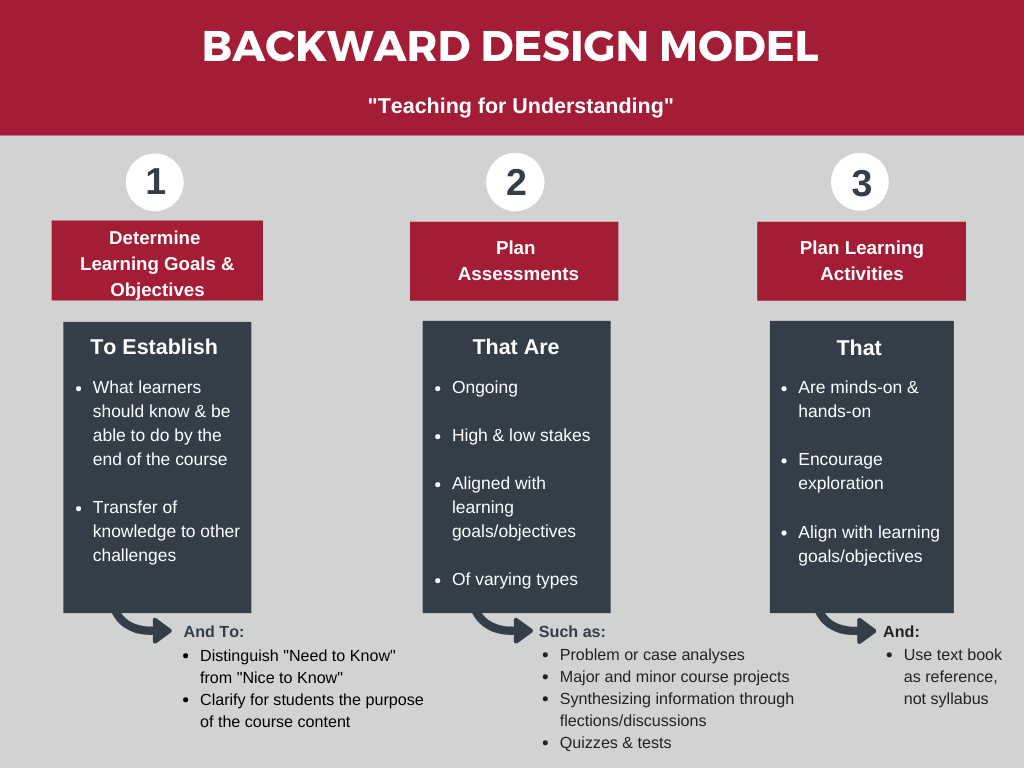
When we design units of study, instructional designers work backward: we start by focusing on what we want the result to be. Then, we work from the goals, backward toward the learning activities.
After we decide on the goals and objectives, we figure out how we will assess whether or not a student has met the objective. Since STEM methods focus on the process of learning more than factual knowledge, rubrics are usually the best way to assess the results. If you're not familiar with developing rubrics, this video is a general introduction:
Once assessments and rubrics are in place, the next step is to design and develop the materials that will lead students to those assessments. There will also be assignments that allow students to practice new skills and demonstrate new knowledge--these also serve as formative assessments, and they can give students the opportunity to work together and receive feedback from the teacher. The content and assignments lead to the assessments, which allow the student to prove competence in a standard.

If you want to learn more about backward design, here's a great resource site.
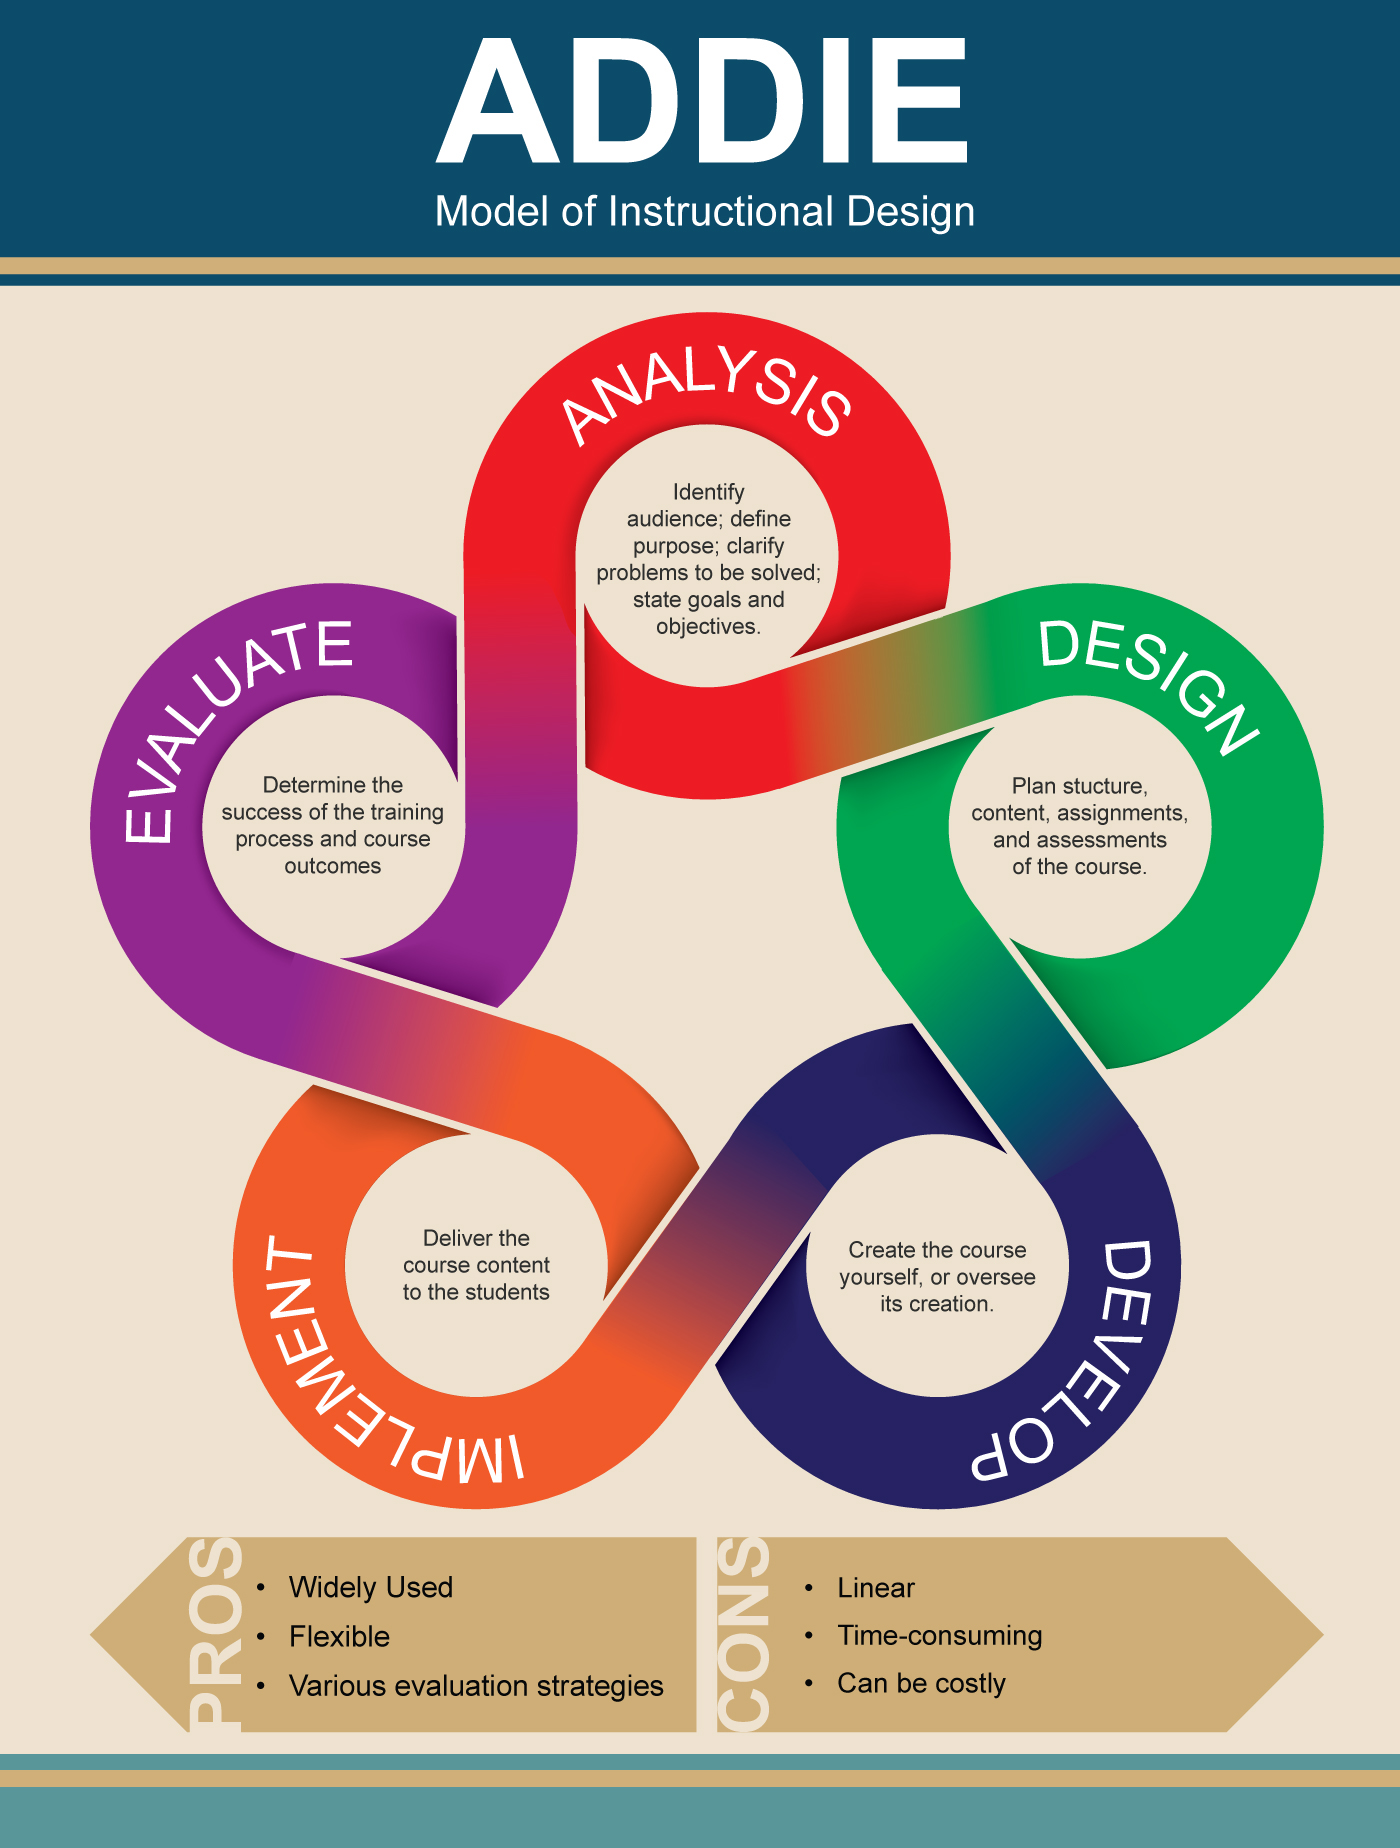
The main approach to instructional design is commonly know as the ADDIE model: Assess, Design, Develop, Implement, Evaluate. This .pdf file nicely summarizes the process. In this unit, we will mostly be addressing the first three parts of the process:
Assess:
- defining course/unit goals
- analyzing learners and their needs
- analyzing what you need to create in order to meet course/unit goals.
Design:
- write objectives
- decide how objectives will be measured (rubrics and assessments)
- plan and strategize instruction
- identify resources (such as textbooks, online content/video archives, existing assessments/rubrics, etc.).
Develop:
- creating lessons and exercises
- developing instructional content (like videos, slide decks, games, discussion prompts).
In this module, we want you to have time to think about the STEM module you will create, and thoroughly design it.
In the next module, you'll implement it and evaluate it.
Implement: this is where you teach the course! And while you are teaching, you are taking notes as to what seems to be working well and what is not.
Evaluate: this is where you get feedback from students (and from your own notes) that will be useful to making changes in the course so that the next version can be improved. The process of improving your courses does not end!
Here's another resource if you want to learn more about the ADDIE model.

Getting started on your design
You may find it helpful to use a design template to help you plan your unit. A template commonly known as "Understanding by Design" can be seen here, and you can watch this video by Dr. Crocker as a guide in how to use the template to plan a unit:
As you think about what unit you would like to create for this course, consider a unit of study that might normally take 2-4 weeks for your students to complete. If you have time and feel confident, you can actually design an entire school term or more--but be prepared to spend a lot of time on it.
Your Task:
While Dr. Crocker's example is common in many American schools, I prefer this design document.
- Choose a design template. You can use Dr. Crocker's or mine.
- Make your own copy of the template (click "File" on the Google Doc menu, then "Make a copy")
- Complete the document (feel free to use Jonathan's video from 4.0 as a guide)
- Post your document below
- I encourage you to ask one of your colleagues to use the Peer Review form to evaluate your work, but this is optional.
When sharing your document,
- click the blue "share" button on the Google Doc
- change settings in the "Get link" section to be "anyone with the link can comment,"
- copy the link and pasting it in your post.
Reply by February 22.
| Status | Discussion | Started by | Last post | Replies | Actions |
|---|---|---|---|---|---|
|
|
|
9 |
|
||
|
Locked
|
|
|
9 |
|
|
|
Locked
|
|
|
6 |
|
|
|
|
|
5 |
|
||
|
|
|
4 |
|
||
|
|
|
3 |
|
||
|
Locked
|
|
|
3 |
|
|
|
Locked
|
|
|
1 |
|
